Make Windows 11 Faster: 20 Advanced Tweaks for Power Users

Callum specializes in breaking down complex technology topics into easy-to-understand guides. He has a background in computer science and technical writing.
Ready to squeeze every last drop of performance from your Windows 11 PC? This guide is for power users who want to go beyond the basics.
These 20 advanced tweaks cover registry optimizations, service management, memory configuration, and hidden settings that most guides never mention. We assume you already know the basics—this is for those who want maximum performance.
⚠️ This is an ADVANCED guide. If your PC suddenly became slow, start with our troubleshooting guide instead. If you want gaming-specific optimizations, see our gaming performance guide.
⚠️ Advanced Users Only
- •Create a system restore point before making ANY changes
- •Some tweaks modify Windows services and registry—proceed with caution
- •Back up your system before attempting registry modifications
- •These optimizations are for experienced users comfortable with system administration
Quick Wins Checklist
Start with these 5-minute fixes for immediate improvement:
- Disable startup programs (Tweak #1)
- Change power plan to High Performance (Tweak #6)
- Disable transparency effects (Tweak #12)
- Enable Storage Sense (Tweak #2)
- Disable Windows tips (Tweak #10)
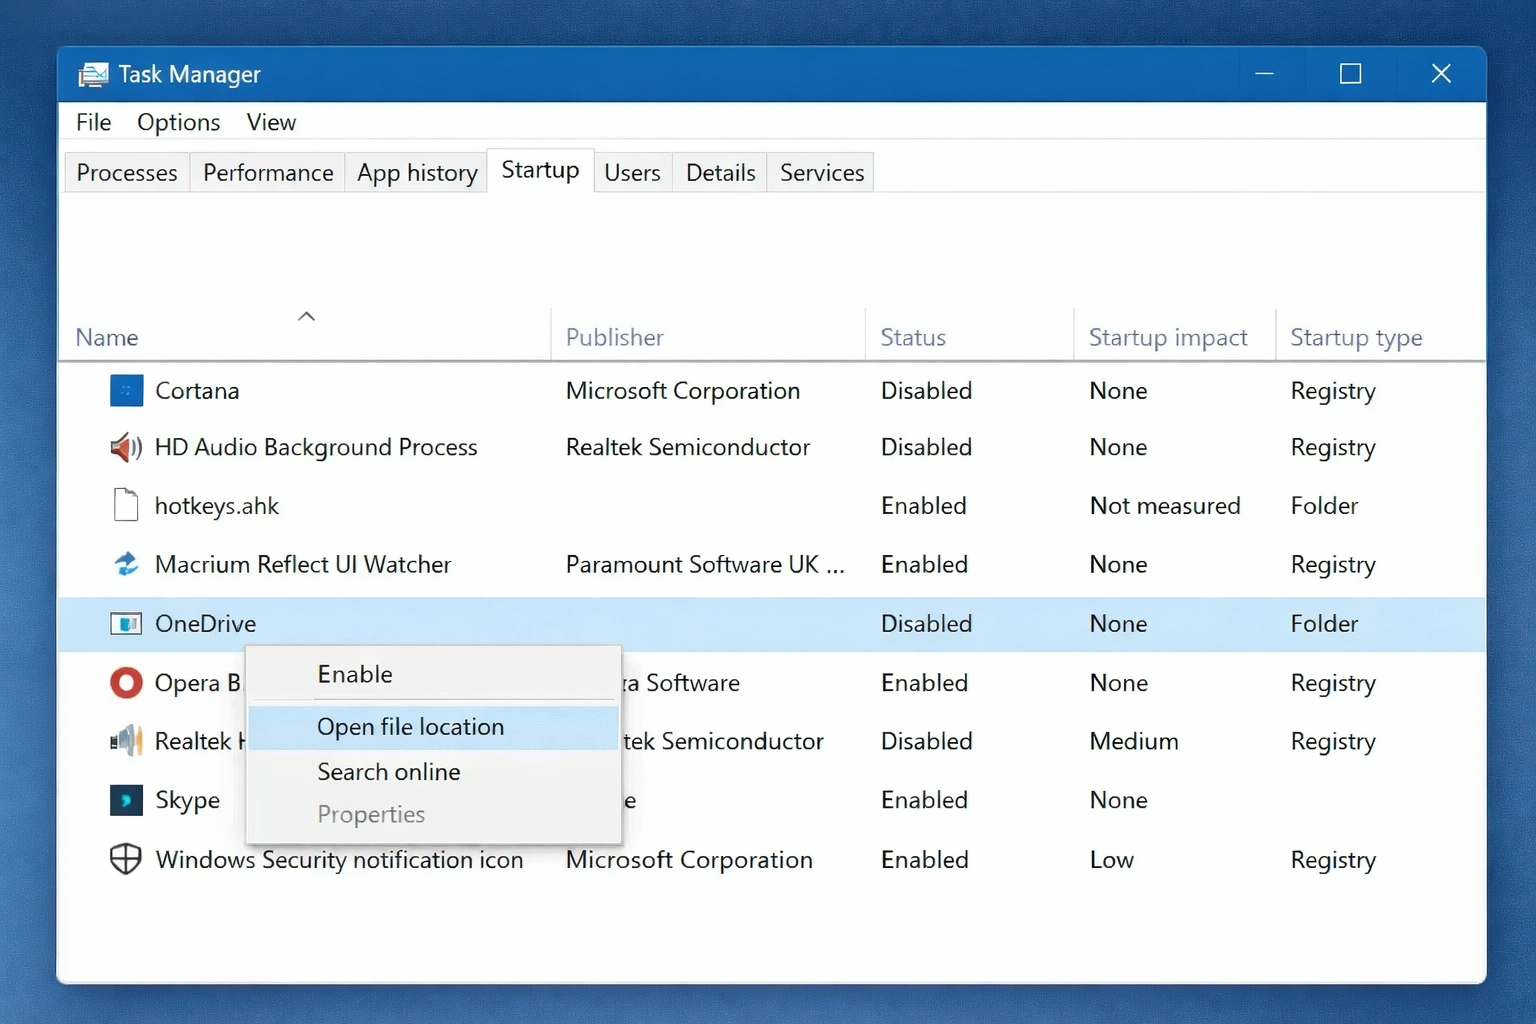
Disable Startup Programs
Startup programs are the #1 cause of slow boot times. Every app that launches at startup competes for system resources during the critical first minutes.
Press Ctrl + Shift + Esc to open Task Manager
Click the 'Startup apps' tab in the left sidebar
Review each program's 'Startup impact' column
Right-click programs you don't need and select 'Disable'
Keep essential programs like antivirus enabled
Pro Tip: Focus on programs rated 'High' or 'Medium' impact first. Disabling just 3-4 heavy startup programs can cut your boot time by 30-50%.
BEFORE
Boot time: 45-60 seconds
AFTER
Boot time: 15-25 seconds
Enable Storage Sense
Storage Sense automatically cleans up temporary files, empties the Recycle Bin, and removes old downloads. A cluttered drive slows everything down.
Open Settings (Win + I)
Go to System → Storage
Toggle 'Storage Sense' to On
Click 'Storage Sense' to configure cleanup schedule
Set to run 'During low free disk space' or 'Every week'
Pro Tip: Enable 'Automatic User content cleanup' to remove files from Downloads folder that haven't been opened in 30 days.
BEFORE
Manual cleanup needed monthly
AFTER
Automatic cleanup keeps drive optimized
Adjust Visual Effects for Performance
Windows 11's animations and visual effects look great but consume significant GPU and CPU resources. Disabling them can dramatically improve responsiveness.
Press Win + R, type 'sysdm.cpl' and press Enter
Click the 'Advanced' tab
Under Performance, click 'Settings'
Select 'Adjust for best performance' (disables all effects)
Or choose 'Custom' and keep only essential effects like 'Smooth edges of screen fonts'
Pro Tip: If 'Adjust for best performance' looks too stark, manually enable 'Show thumbnails instead of icons' and 'Smooth edges of screen fonts' for a balanced approach.
BEFORE
Choppy window animations, slow menus
AFTER
Instant window snapping, responsive UI
Disable Search Indexing (or Limit It)
Windows Search constantly indexes your files in the background. While useful for quick searches, it can significantly impact performance on HDDs or older systems.
Open Settings → Privacy & security → Searching Windows
Under 'Find My Files' select 'Classic' (indexes only common locations)
Or disable completely: Press Win + R, type 'services.msc'
Find 'Windows Search' service
Right-click → Properties → Set Startup type to 'Disabled'
Pro Tip: If you need search functionality, use 'Classic' mode instead of 'Enhanced'. It indexes fewer locations but still provides quick results for common folders.
BEFORE
Constant disk activity, 5-10% CPU usage
AFTER
Quieter disk, resources freed for active apps
Update Windows and Drivers
Outdated drivers and Windows versions often contain performance bugs. Microsoft and hardware manufacturers regularly release optimizations.
Go to Settings → Windows Update
Click 'Check for updates' and install all available
Click 'Advanced options' → 'Optional updates'
Install any driver updates listed
Visit your GPU manufacturer's website (NVIDIA/AMD/Intel) for the latest graphics drivers
Pro Tip: Don't rely solely on Windows Update for GPU drivers. Download directly from NVIDIA GeForce Experience, AMD Software, or Intel Arc Control for optimal gaming performance.
BEFORE
Random stutters, compatibility issues
AFTER
Smooth performance, latest optimizations
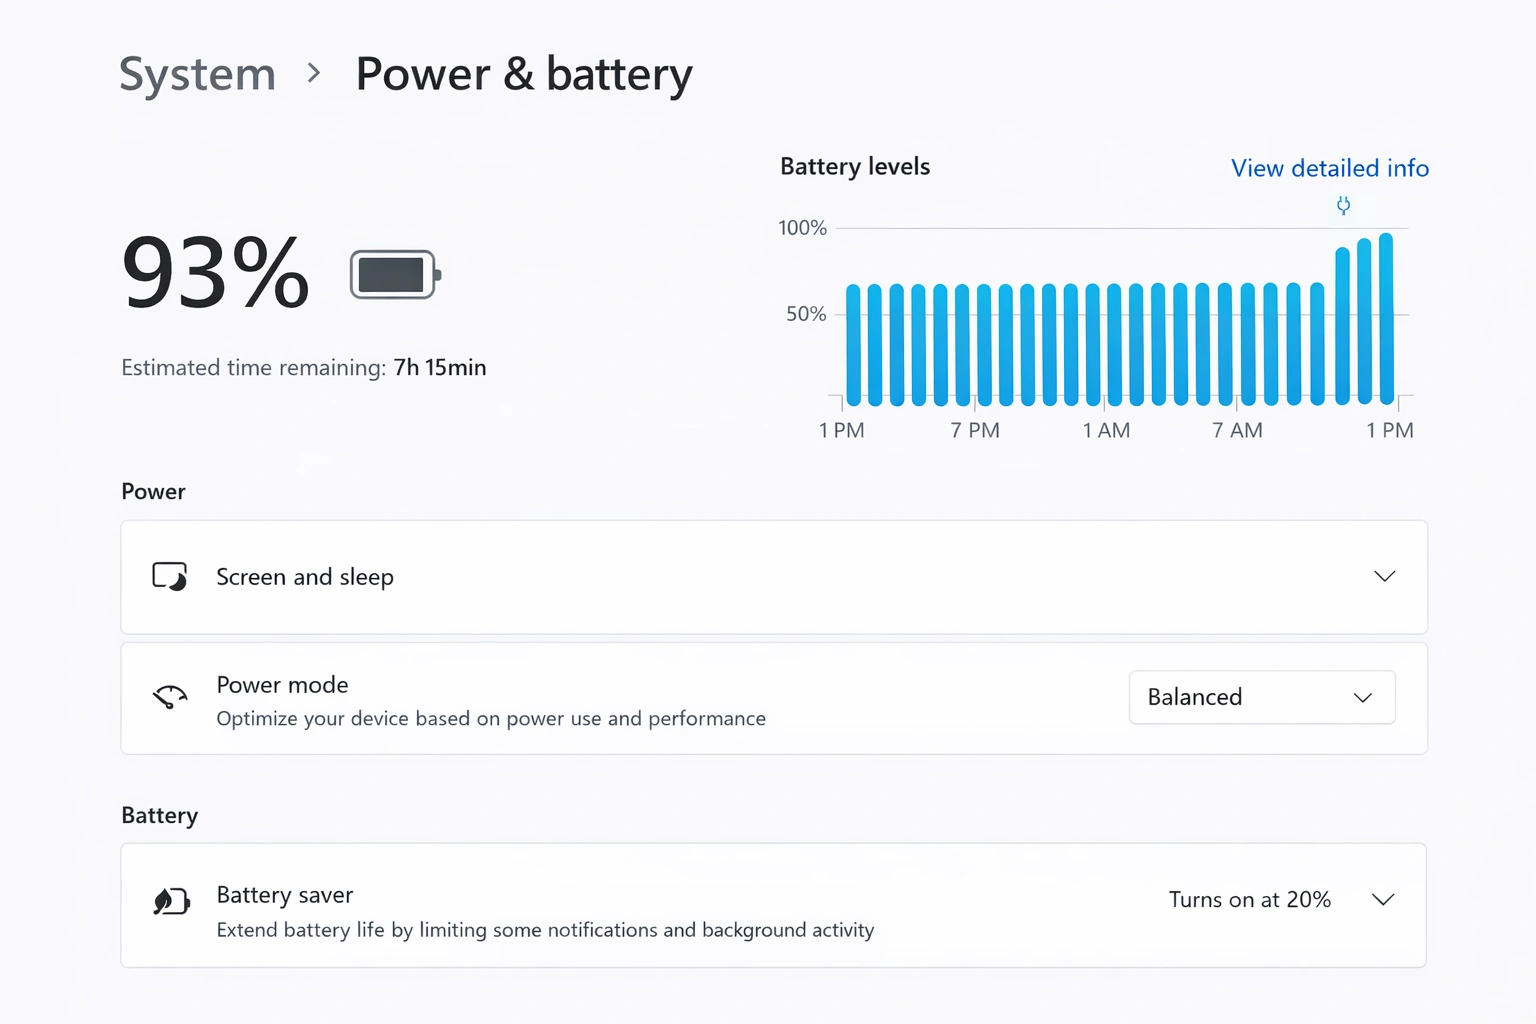
Change Power Plan to High Performance
Windows 11's default 'Balanced' power plan throttles performance to save energy. For desktop PCs, switching to 'High Performance' unlocks full potential.
Press Win + R, type 'powercfg.cpl' and press Enter
Select 'High performance' (click 'Show additional plans' if not visible)
If using a laptop, consider 'Balanced' when on battery
For ultimate performance: Open Command Prompt as Admin
Run: powercfg -duplicatescheme e9a42b02-d5df-448d-aa00-03f14749eb61
Pro Tip: The hidden 'Ultimate Performance' plan (activated via command) is designed for workstations and provides even more aggressive performance settings.
BEFORE
CPU throttled at 70-80% capacity
AFTER
Full CPU and GPU performance unlocked
Disable Background Apps
Many Windows apps run in the background even when you're not using them, consuming RAM and CPU cycles.
Open Settings → Apps → Installed apps
Click the three dots next to each app you don't use
Select 'Advanced options'
Under 'Background apps permissions' select 'Never'
Repeat for apps like Xbox Game Bar, Phone Link, etc.
Pro Tip: Focus on Microsoft apps you don't use: Cortana, News, Weather widgets, and Your Phone consume resources constantly.
BEFORE
15-20 background processes running
AFTER
Only essential services active
Increase Virtual Memory (Page File)
When RAM fills up, Windows uses the hard drive as 'virtual memory'. Setting this manually can improve performance, especially with 8GB RAM or less.
Press Win + R, type 'sysdm.cpl' and press Enter
Go to Advanced → Performance Settings → Advanced tab
Click 'Change' under Virtual Memory
Uncheck 'Automatically manage paging file size'
Select your main drive, choose 'Custom size'
Set Initial = 1.5x RAM, Maximum = 3x RAM (e.g., 12GB/24GB for 8GB RAM)
Pro Tip: If you have an SSD, place the page file there for faster virtual memory access. With 16GB+ RAM, you can often let Windows manage this automatically.
BEFORE
System freezes when RAM is full
AFTER
Smooth performance during heavy multitasking
Run Disk Cleanup (Extended)
Disk Cleanup removes system files that Storage Sense doesn't touch, including old Windows Update files, driver packages, and system cache.
Press Win + S, search 'Disk Cleanup'
Select your Windows drive (usually C:)
Click 'Clean up system files' for extended options
Check all boxes, especially 'Windows Update Cleanup' and 'Previous Windows installations'
Click OK and confirm deletion
Pro Tip: 'Previous Windows installations' can free up 20GB+ but removes the ability to roll back. Only delete if your system is stable after recent updates.
BEFORE
10-30GB of unnecessary system files
AFTER
Clean drive with optimal free space
Disable Windows Tips and Suggestions
Windows constantly analyzes your usage patterns to show tips and suggestions. This background scanning uses resources and can cause momentary slowdowns.
Open Settings → System → Notifications
Scroll down and uncheck:
'Offer suggestions on how I can set up my device'
'Get tips and suggestions when I use Windows'
'Show me the Windows welcome experience after updates'
Pro Tip: This also stops those annoying pop-ups recommending Edge or OneDrive every few days.
BEFORE
Random notification interruptions
AFTER
Distraction-free, slightly faster system
Defragment HDD or Optimize SSD
HDDs become fragmented over time, slowing file access. SSDs need periodic TRIM optimization. Windows 11 does this automatically but may not run frequently enough.
Press Win + S, search 'Defragment and Optimize Drives'
Select your main drive
Click 'Optimize'
For scheduling: Click 'Change settings'
Enable 'Run on a schedule' and set to 'Weekly'
Pro Tip: Never use third-party defrag tools on SSDs—they can reduce lifespan. Windows' built-in tool automatically uses TRIM for SSDs instead of defragmentation.
BEFORE
Slow file loading, fragmented HDD at 15%+
AFTER
Fast file access, 0% fragmentation
Disable Transparency Effects
Windows 11's acrylic blur and transparency effects require GPU processing. Disabling them frees resources for applications.
Open Settings → Personalization → Colors
Toggle off 'Transparency effects'
The change takes effect immediately
Pro Tip: This is especially impactful on integrated graphics (Intel UHD, AMD Radeon Graphics) where GPU resources are shared with the CPU.
BEFORE
Slight UI lag, GPU usage for effects
AFTER
Snappier interface, more GPU headroom
Disable Game Mode (If Not Gaming)
Game Mode reserves system resources for games, which can ironically hurt performance if you're not gaming and cause conflicts with certain applications.
Open Settings → Gaming → Game Mode
Toggle 'Game Mode' to Off
Also go to Gaming → Xbox Game Bar
Toggle off 'Open Xbox Game Bar using this button'
Pro Tip: If you do game, keep Game Mode on but disable Xbox Game Bar separately. Game Bar's overlay can cause stuttering in some games.
BEFORE
Resources reserved for non-existent games
AFTER
All resources available for productivity
Disable Superfetch/SysMain (For HDD Users)
SysMain (formerly Superfetch) preloads frequently used apps into RAM. On HDDs, this causes constant disk activity. On SSDs, it's less problematic.
Press Win + R, type 'services.msc'
Find 'SysMain' in the list
Right-click → Properties
Set 'Startup type' to 'Disabled'
Click 'Stop' to disable immediately
Pro Tip: Only disable this if you have an HDD or notice constant 100% disk usage. On modern SSDs with 16GB+ RAM, SysMain actually helps.
BEFORE
100% disk usage, system unresponsive
AFTER
Normal disk activity, responsive system
Scan for Malware and PUPs
Hidden malware and potentially unwanted programs (PUPs) are a major cause of slowdowns. They run hidden processes that consume resources.
Open Windows Security from the Start menu
Go to Virus & threat protection
Click 'Scan options'
Select 'Full scan' and click 'Scan now'
Additionally, run Windows Security → Device performance & health check
Pro Tip: For deeper scanning, use Malwarebytes Free (one-time scan). It catches PUPs that Windows Defender often misses.
BEFORE
Unknown processes using 20-40% CPU
AFTER
Clean system, resources freed
Disable Delivery Optimization
Delivery Optimization shares Windows updates with other PCs on the internet, using your bandwidth and system resources.
Open Settings → Windows Update
Click 'Advanced options'
Click 'Delivery Optimization'
Toggle off 'Allow downloads from other PCs'
Or select 'PCs on my local network' for LAN-only sharing
Pro Tip: Keep 'Local network' enabled if you have multiple PCs at home—it speeds up updates for all devices without using internet bandwidth.
BEFORE
Random upload spikes, bandwidth used
AFTER
Full bandwidth for your activities
Clean Browser Cache and Extensions
Browsers are often the heaviest programs. Accumulated cache and too many extensions dramatically slow down not just browsing but system-wide performance.
In Chrome/Edge: Press Ctrl + Shift + Delete
Select 'All time' for time range
Check 'Cached images and files' and 'Cookies'
Click 'Clear data'
Go to Extensions (chrome://extensions) and remove unused ones
Pro Tip: Each browser extension runs as a separate process. 10 extensions can use 500MB+ RAM. Audit extensions quarterly and remove what you don't actively use.
BEFORE
Browser using 4GB+ RAM, slow page loads
AFTER
Lean browser, faster browsing
Disable Cortana and Web Search
Cortana and web search in the Start menu constantly communicate with Microsoft servers and index your activities. Disabling them improves privacy and performance.
Open Settings → Apps → Installed apps
Find 'Cortana', click three dots → Advanced options
Toggle off all permissions and set 'Run at startup' to Off
For web search: Open Registry Editor (regedit)
Navigate to HKEY_CURRENT_USER\Software\Policies\Microsoft\Windows
Create key 'Explorer', create DWORD 'DisableSearchBoxSuggestions' = 1
Pro Tip: The registry tweak requires a restart to take effect. Alternatively, use Winaero Tweaker for a GUI-based approach.
BEFORE
Start menu lag, Bing results clutter
AFTER
Instant Start menu, local search only
Enable Hardware-Accelerated GPU Scheduling
This feature offloads GPU scheduling from the CPU to the GPU itself, reducing latency and improving performance in games and GPU-intensive apps.
Open Settings → System → Display
Scroll down and click 'Graphics'
Click 'Change default graphics settings'
Toggle on 'Hardware-accelerated GPU scheduling'
Restart your computer
Pro Tip: This requires a modern GPU (NVIDIA 10-series or newer, AMD RX 5000+, Intel Xe). Older GPUs may not support this feature.
BEFORE
CPU handles GPU task scheduling
AFTER
Reduced input lag, better FPS stability
Perform a Clean Boot
A clean boot starts Windows with minimal drivers and programs. This helps identify if third-party software is causing slowdowns.
Press Win + R, type 'msconfig'
Go to 'Services' tab
Check 'Hide all Microsoft services'
Click 'Disable all'
Go to 'Startup' tab, click 'Open Task Manager'
Disable all startup items
Restart and test performance
Pro Tip: If performance improves dramatically in clean boot, re-enable services one by one to find the culprit. Common offenders: printer software, cloud sync tools, RGB lighting software.
BEFORE
Unknown service causing slowdown
AFTER
Identified problematic software
Advanced Optimizations
For power users comfortable with system settings:
- Adjust virtual memory settings (Tweak #8)
- Disable SysMain for HDD systems (Tweak #14)
- Enable hardware GPU scheduling (Tweak #19)
- Perform clean boot diagnostics (Tweak #20)
When Software Tweaks Aren't Enough
If you've applied all these optimizations and still experience slowdowns, consider these hardware upgrades:
The single biggest upgrade. Expect 5-10x faster boot and app loading.
Eliminates slowdowns during multitasking and browser-heavy workflows.
If your PC is 3+ years old, fresh thermal paste can reduce CPU throttling.
Your Faster Windows 11 Awaits
You don't need to apply all 20 tweaks at once. Start with the Quick Wins checklist, and if you're still not satisfied, work through the advanced optimizations. The beauty of these tweaks is that they're all reversible—if something doesn't feel right, you can always undo it.
Bookmark this guide and revisit it after major Windows updates, as Microsoft sometimes resets these settings.
Frequently Asked Questions
Will these tweaks void my warranty?
No. These are all software configurations that Microsoft supports. None of them modify system files in unsupported ways.
How often should I perform these optimizations?
Run Disk Cleanup monthly, check startup programs after installing new software, and revisit power settings after major Windows updates.
Can I undo these changes?
Yes, every tweak is reversible. If you created a restore point as recommended, you can always roll back completely.
Do these work on Windows 11 Home?
Yes, all 20 tweaks work on Windows 11 Home. Some Group Policy options require Pro, but we've provided alternative methods.